
EP3 EPS PrecisionMount™ Steering Rack Centering Bushings Installation
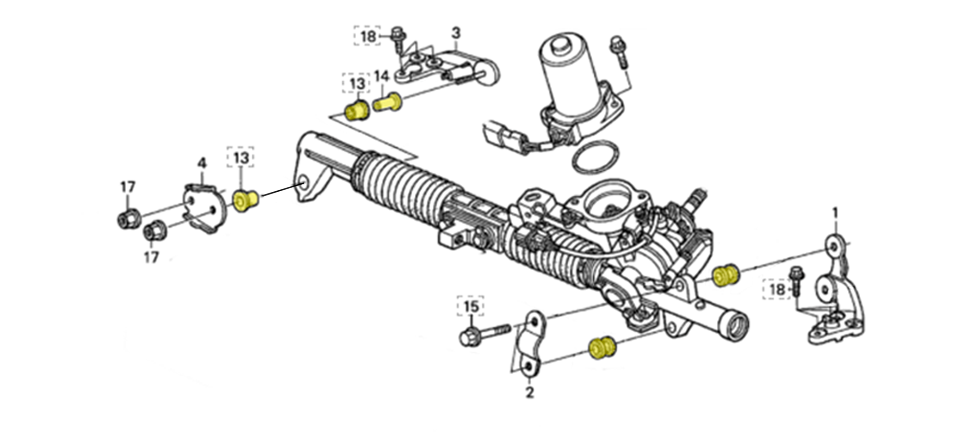
Note: A bushing installation without completely removing the steering rack from the vehicle is possible, although all our installations have been with the rack out of the vehicle.
Under dash, where the steering column connects to the rack, mark the current location where the splines connect rack so the steering wheel alignment can be easily restored upon re-installation. Disconnect them by removing the 10mm bolt.
Disconnect Steering Tie Rods from Suspension/Struts using an appropriate pulling/removal tool.
Remove nuts 17, bolts 15, and plates 2 and 4 in the diagram and put them aside. Loosen or remove Brackets 1 and 3. Remove and place mid-bar aside.
Remove the large bushing by prying off the top half with a flat-tipped screwdriver and gently knocked out the other side. Stubborn bushings including the two smaller ones will need a C-clamp with large enough sockets or a “control arm bushing tool” can be used to push them out.
Replace the smaller bushings with our units from the backside and fit bushing “caps” on the top side. Reinstall plate 2 and hand tighten both bolts 15 to the bracket 1.
Place one large bushing on to bracket 3 and fit the rack on top. Place the other large bushing into the rack, hand tighten nuts 17 with plate 4 in between. Reconnect steering column to rack using the mark from step 1.
Hand tighten bolts 18 and make sure all bolts have thread engagement due to tighter clearances. Once confirmed, finalize installation to factory torque specs which are: fasteners 15 and 17 in the illustration are torqued to 45 Ibf/ft. or 61 Nm. Fasteners 18 will be torqued to 22 Ibf/ft. or 29 Nm, same with bolts for mid-bar.
Reconnect steering tie rods to suspension torqued to 40 Ibf/ft. or 54 Nm and replace cotter pin.
Tighten the under dash 10mm bolt removed that connects the steering column to the steering rack.
Take the vehicle for a test drive, re-tighten/torque any bolts if necessary. Note: Front wheel alignment may be necessary since the rack is now properly centered.